Homemade piñata’s were a common part of my childhood. 🙂 My mom often made them with us in preparation for our annual “pumpkin party” that happened each fall. Ours was typically a jack-o’-lantern and was a central piece of this big social event each year. I’ve never seen it done… at least not since my own childhood. So with the surprise eggs themed birthday party that Cashel chose this year we made a special request that our Nona would make one with Cashel for his birthday party. A colorful “egg” pinata – that the kids would hit, old school style!
Here’s how it goes…


Supplies:
Water
Flour
Newspaper
White computer paper
Large bowl or colander to function as a base.
Mix water and flour in equal parts until thin – but the texture really is key so if it is too “gloppy” and won’t slide onto the paper strips add a bit of water. It should be like a thin paste. My mom suggests a couple cups of flour and a couple of water. (No nailing her down to exact measurements.) If it’s too runny it won’t stick or dry easily though so play this part a bit by ear.
Instructions:
1. Make paste.
2. Rip slips of newspaper.
3. Blow up a large balloon. (Use an egg shape or round balloon depending on what you’d like to make)
4. Dip strips into paste and drape over balloon. Be sure to cover your work surface with newspaper so the glue-like paste doesn’t ruin your table/counter.
5. Let the first layer dry partially by setting the balloon in a bowl. Then do a second layer using strips of computer paper. Using the plain white color allows you to have a blank canvas and use really any kind of paint rather then being limited to a more full coverage paint.
6. Let this fully dry, overnight to 24 hours.
7. Paint using your own design. You can also cut strips of tissue paper into fringe and glue on (like a traditional pinata) and add printed elements. Like a face or logo by printing it from your computer. So many possibilities!


To fill it we just popped the balloon and used small trinkets and slips of paper that read things like “trade in for one paint pad.” “worth one pair of disguise glasses.” “good for one container of bubbles.” “random selection.” We liked doing this so that you could give more substantial favors/treats to the kiddos and so that I could stay away from using much (in this case I used NO) candy. I had a prize basket that functioned like a store and kiddos exchanged their coupons for fun additional larger gifts. We put them all in the balloon and then tied a rope to a stick. We inserted the stick in vertically to the piñata and then turned it horizontally inside the piñata. Then we strung a lid onto the rope to center it and function as a top. You could also paper mache around the rope if you had more time but it does need to be something that is stable. This allows the rope to stay centered. My husband tied a rock onto the end of the rope and threw it up over a branch in a tree, then stabilizing it on another branch until we were ready to hit. This allowed for it to be “décor” but also stay out of reach of kids until it was time.
Cashel just painted it a variety of colors because it was just supposed to look like an egg. When I was growing up we painted it orange and added a jack-o-lantern face and green stem top for our annual “Pumpkin Party.” The fun thing about this is that a circle can be such a versatile shape and truthfully you could probably get really grand with this and use multiple balloons if you wanted to. I can just see us making all kinds of pinatas in our future! Hope you’ll give it a try and share photos of your’s below if you do. I’d love to see your ideas inspire others!

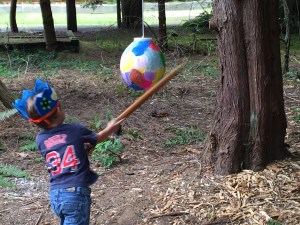

It was a total hit! Pun intended. 
We were grateful for a couple of older guests that are Cashel’s special buddies who, after all the little ones took a turn to hit the piñata, really blew the sucker open.


I do suggest having a large area for kids to “stand back” maybe a parent helper who keeps them at bay. Next time I might use a bit of streamer or something like caution tape to use as a border. That would help kids wait their turn and stay out of the way of the bat. You may also need an older sibling, party goer, or even parent to hit the piñata if the kiddos can’t fully crack it. I think the more layers you do the more it might be likely to break. Ours had tears and bends but took an older friend to really “bust it open.” That being said our attendees were ages 2-6. (wink wink)
